This article will be a simple demo where we will deposit 10,000 USD in Cygnus and we will describe in detail exactly how the contracts work at each step and we will be reviewing the outcomes of borrowers and lenders upon withdrawing all funds from Cygnus.
The new version of the contracts were published this month on our Github: https://github.com/CygnusDAO/core/tree/main/contracts/cygnus-core and they bring huge improvements to the Cygnus protocol!
This article is only part 1. Throughout the series we will go over smart contract development and frontend implementation! We will explain in detail user interactions with Cygnus Core:
1. Depositing — You are here.
2. Leveraging.
3. Reinvesting Rewards.
4. Flash Liquidations.
5. Deleveraging.
CygnusV2 contracts are a huge improvement over our previous version. These improvements include:
- Gasless Token approvals with Uniswap’s Permit2. Uniswap’s permit2 is a complete game changer and we use it in our core contracts to handle token transfers from users. This means the protocol NEVER has access to user’s funds and users never have to give approval to Cygnus contracts.
2. MOAR leverage. With the new Cygnus Core contracts users can leverage their liquidity up to 50x. This means their position in the pool will earn 50x more rewards and trading fees! The default is set to x13, but this can be updated up to through careful adjustment of incentives.
The new formula for calculation leverage amount is given by a simple ratio between the pool’s debt ratio, liquidation incentive and liquidation fee:
Max Leverage = (Liq. Incentive + Liq. Fee) / (Liq. Incentive + Liq. Fee - Debt Ratio)

3. Flash Liquidations. Anyone on the network can liquidate positions without the need to have any USDC or approve any token! We developed a frontend where users can liquidate from there without the hustles of making their own bots or any programming experience.


4. Integration wtih DEX Aggregators for ULTRA low slippage. We integrated at the smart contract level with the 2 most widely used Aggregators: Paraswap and 1Inch. Our periphery contract is integrated with both dex aggregators, allowing users to convert USDC <-> Liquidity at optimal rates!
5. Reinvesting rewards with Dex Aggregators. All rewards from the pools can be reinvested by anyone on the network using 1Inch. This is a vast improvement over the typical yield aggregators which just use UniswapV2/UniswapV3 to swap the rewards.
6. Integration with the most popular DEXes including UniswapV2, UniswapV3, Balancer, BeethovenX, Gamma and Sushi Trident, etc.
7. Rewards for Lenders. As opposed to other lending protocol, user’s USD funds are deposited in strategies and can only be withdrawn by borrowers. This means that the un-used funds (funds not being borrowed at the moment) are sitting in strategies earning yield + interest from borrows.
Part 1 — Deposit using Permit2
Every protocol from now on benefits so much from integrating with Permit2. It makes users funds much safer and brings WAY better UX for your protocol!
In the case of Cygnus, both lenders and borrowers can deposit in the contracts and receive vault tokens (representing their underlying position) without ever having to approve the Cygnus contracts. This saves 1 step over the usual workflow of approve token first, deposit after.
To deposit, users need to first approve Uniswap’s Permit2 Router on the token. This might seem strange since we are not saving any steps yet (users still need to approve) but notice the difference: Users are approving Permit2 in their asset (for example USDC) instead of approving a protocol contract in their . This means that once users approve Permit2 in the asset, they can interact with any protocol that uses Permit2 without approving again! To illustrate:
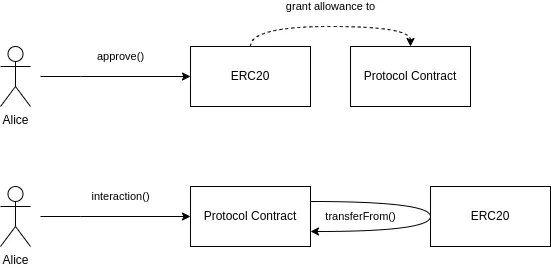

Put simply, if every protocol was using permit2, then users would only need to approve permit2 once, and then can interact with that asset with any protocol without having to approve again. Traditionally, this would require to approve each protocol contract in USDC everytime users want to interact with them.
Frontend & Smart Contract Implementation
Here is the deposit function where lenders and borrowers can deposit USDC and Liquidity Tokens respectively. Notice that we chose to use IAllowanceTransferinstead of ISignatureTransfer. This is because our CygnusAltair contract uses the deposit function when users leverage positions and signature transfer would not work here!

The flow is pretty simple, it is very similar to ERC4626.
- User calls deposit
- We check for the signature passed
- If there is a signature, then we call
permiton Permit2, granting allowance to the contract. Users can just manually approve the contract in the Permit2 router and can pass an empty signature, but then they would be giving the contract power over their funds. - We then call the Permit2’s
transferFromand transfers the asset from the depositor to the contract - We deposit in the strategy using the
_afterDeposithook. - We mint vault token (CygUSD or CygLP) to the depositor.
Implementation and Testing with ethers.js
Implementing the Permit2 flow is very simple. In this example a lender will deposit USDC into Cygnus using Permit2.
The only thing we really need is to install Uniswap’s Permit2 SDK, although it’s not really needed.
SDK: https://github.com/Uniswap/permit2-sdk
Contracts: https://github.com/Uniswap/permit2/tree/main
npm i @uniswap/permit2-sdk
Once we have the SDK installed we can use ethers to interact with our contract to pass the permit and signature.
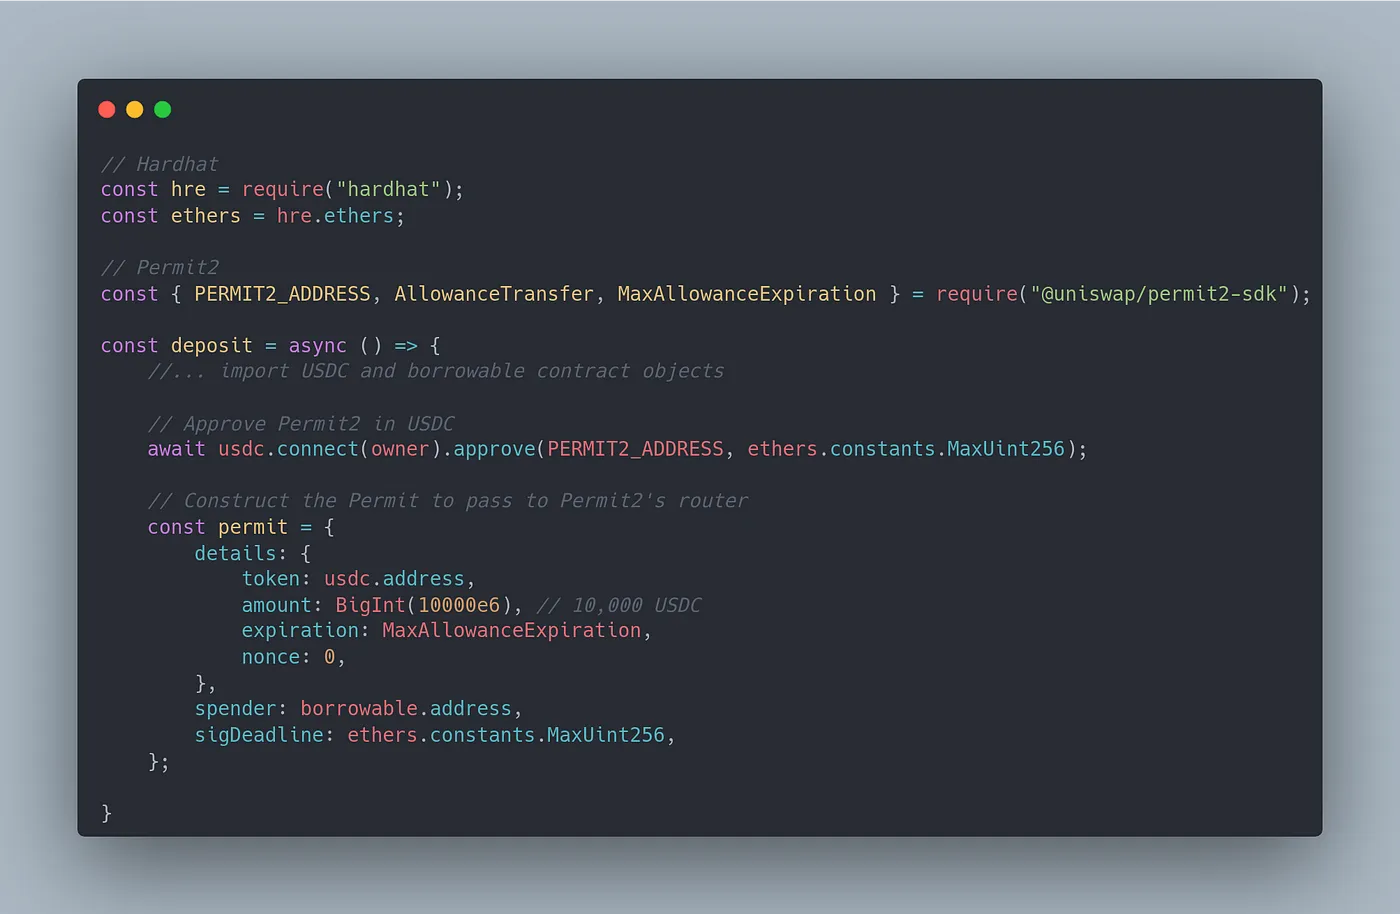
In test.js import the variables needed from the SDK:

Notice that PERMIT2_ADDRESS is the same across all chains so to integrate it on your contract you should also hard-code the address on your contracts.
IAllowanceTransfer public constant override PERMIT2 = IAllowanceTransfer(0x000000000022D473030F116dDEE9F6B43aC78BA3);
We must approve the permit2 contract in the USDC contract first, so:

Now we can directly interact wtih Permit2.
As mentioned above we used AllowanceTransfer and our deposit function calls the permit function on the Permit2 contract, so let’s see what arguments we need for the permit:

Notice the second argument, permitSingle. This permitSingle argument is a struct, so let’s check IAllowanceTransfer.sol to see what it means:

Pretty simple! It’s a struct which takes another struct, along with a spender and the signature deadline!
So let’s construct the permit with ethers.js. Notice that the struct we are creating on JS must match exactly with the one in the contract.
We manually pass a nonce of 0 since this is our first interaction in the test, but protocols should actually query the nonce from the Permit2 router contract by calling the allowance function on the Permit2 router (https://github.com/Uniswap/permit2/blob/main/src/interfaces/IAllowanceTransfer.sol#L109) Notice that the third return value is the user’s nonce.
Now that we have built the permit we can use Uniswap’s SDK to get the data for the user to sign. This is the same as ERC2612 permits, except notice the struct is different. If you have experience with ERC2612, then building the data is simple enough, however using the SDK just makes it easier:

Now that we have the data, we need the signature from the user to pass it to our contract. With the signature, our deposit function will call the router’s permit() function, granting us allowance during the function call to transfer the tokens.

The _signTypedData function will prompt the user’s favourite wallet to sign the permit. After the user signs we now have all we need to deposit our USDC! We simply pass the Permit we built with the user’s Signature to our deposit function!

This is all that is needed to integrate with Permit2. As you can see it is very simple and it brings such nice improvements to UX! We are really excited what Permit2 allows! It makes DeFi so much safer and saves users a ton of gas from approving protocol contracts to interact with them!
And this is Part 1 of the series. The main idea of this article was to show how to integrate Uniswap’s Permit2 into your contracts and frontend, improving the UX for your users!
In the following articles we will go over each improvement (Leverage, reinvest, flash liquidations, etc.) mentioned at the start of this article.
Thanks for reading!